
Testing Is Everything To Us
We test every valve under water pressure to make sure it does not leak and functions properly before we ship it to you. This ensures that your valves are working properly before they are installed.

The Solution
Watch video on how to adjust handles

The most common reason for this is that the installer has tried to adjust the handles to be straight by loosening the water cartridge or valve on the rough-in and this has created a gap in the seal that prevents water from coming out. We water test every valve before it ships to make sure that it does not leak when it is off. So if your faucet has a slow leak, this means the valve cartridge was possibly tampered with. We do include a note on how to install the handles in our instructions that come with the faucet.
The solution
Tighten up both hot and cold cartridges and then adjust the handles by watching the video on adjusting handles.

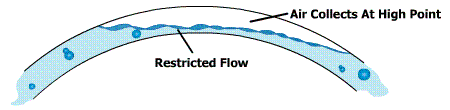
The most common reason for a lack of water coming though a water fixture is an air bubble or air pocket called an “air gap”. This can happen with any plumbing fixture, but is very common in showers and tub fillers. This cavity of air that is trapped at usually an elbow or combination of elbows or turns is formed during the construction process. This air can restrict the water flow and make it very hard for water to pass though at its full volume. The air is basically trapped in a corner or pocket and is not able to be pushed thought with just water pressure.
The Solution
Remove an air gap from plumbing lines.
1. Turn off the main water supply to your house.
2. Open all faucets and fixtures, including those in the basement and outdoor hose bibs.
3. Wait for the faucets to run dry or until you hear sputtering and bubbling sounds. This indicates the air is escaping the system.
4. Flush all toilets to help clear trapped air.
5. Slowly turn the main water supply valve back on .
6. Keep the faucets open while the system re-pressurizes.
7. Close the faucets in reverse order of how you opened them (starting with the highest faucet and working your way down), or from the highest to the lowest.
8. Let water run for 10 to 15 minutes to ensure all air is out.
Why this works
Opening the main valve after shutting off the supply allows water to fill the pipes while the faucets are open, creating a path for the air to be pushed out. Closing them in the correct order helps create a natural flow that pushes the air out. If the problem persists with stubborn air pockets that keep returning, you may have a more significant issue, such as a leak or faulty plumbing, and should contact a professional plumber.

Most of the time when the water will not shut off from a shower, it is the lower thermostatic lever that is being used to try and shut the water off, instead of the top diverter lever. The water is only shut off by the top lever, which is the diverter part of the valve. This top lever turns the water on and off, as well as directs the water to either the shower head or the handheld sprayer.
The Solution
Use the top lever to shut water off.
